Laravel Beginners CRUD Application Tutorial
Laravel 8 Beginners CRUD Application Tutorial
Hello everyone, in this Laravel 8 Beginners CRUD Application Tutorial, I will show you how easily you can create a Laravel CRUD (Create-Read-Update-Delete) application easily. We will use Laravel version 8 here which is latest version when I am writing this tutorial.
So Lets begin. For creating a Laravel CRUD at first we will install a fresh Laravel application. Run the below command in your terminal. In our case case, we gave our project name as “laravel8crud“. You can choose your project name as per your wish.

STEP 1: Install Laravel Globally

composer global require laravel/installer
We installed laravel globally so that you can easily create project next time and also anywhere in your any folder. Not only in htdocs (Xampp) or www (Laragon). This will give you much more flexibility.
STEP 2: Create new Laravel Project
laravel new laravel8crud
Typically it will take some time based on your network connection. After new project creation is successful, you can see a success message like
Application ready! Build something amazing.
STEP 3: Go to the project folder and open in your favorite text editor
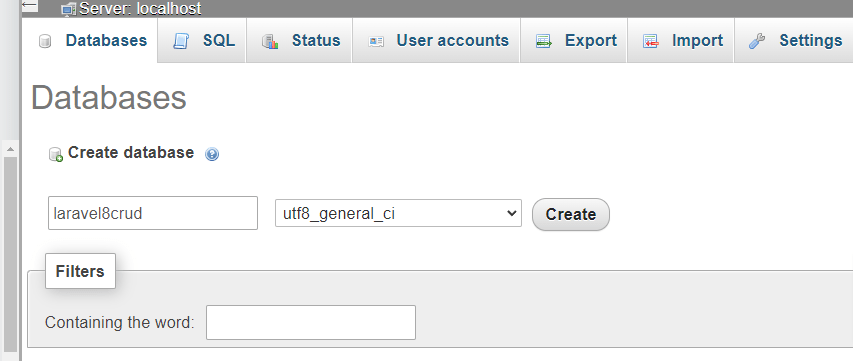
After successful installation, open your project in your favorite code editor. I am using VS Code here. When you open your project, you can see a .env file which contains all the environment variable of your project. We will set our Database credentials in this file. Open phpmyadmin and create a Database of your choice. We are giving our Database name as “laravel8crud“.

STEP 4: Update Database Credentials in .env
Now in your .env file update your database name, username and pass accordingly.
STEP 5: Create Resource Model with Controller and Migrations
In this step we will start our actual coding. For this, we will run the below command. Lets say, we want to create a Laravel CRUD for Employees. So the command will be:
php artisan make:model Employee -mcr
If you check closely, you can see that there are four parts in the command.
- php artisan : initial command to run any laravel command
- make:model: we are giving command to create a Model
- Employee : here our model name is “Employee “
- -mcr : we are creating migration file and resource controller side-by-side
STEP 5: Go To Database folder, then Migrations folder, you can see Employee migration file, open that file and paste the following
<?php

use Illuminate\Database\Migrations\Migration;
use Illuminate\Database\Schema\Blueprint;
use Illuminate\Support\Facades\Schema;

class CreateEmployeesTable extends Migration
{
    /**
     * Run the migrations.
     *
     * @return void
     */
    public function up()
    {
        Schema::create("employees", function (Blueprint $table) {
            $table->id();
            $table->string("name");
            $table->string("email");
            $table->text("details");
            $table->string("address");
            $table->string("phone_no");
            $table->date("joining_date");
            $table->timestamps();
        });
    }

    /**
     * Reverse the migrations.
     *
     * @return void
     */
    public function down()
    {
        Schema::dropIfExists("employees");
    }
}
STEP 6: Generate Database tables by running artisan command
Now if you run “php artisan migrate”, it will generate all the tables automatically, that’s the beauty of Laravel and Migrations.
php artisan migrate
STEP 7: Add Routes in the route.php file
Fore adding routes, we will use Laravel Resource route. That will provide us all the required routes and methods for crea5ting the CRUD. Remove everything from the route file and add the following code to your route file. You will find the route file in routes/web.php file.
<?php

use Illuminate\Support\Facades\Route;
use App\Http\Controllers\EmployeeController;

Route::get("/", function () {
    return view("welcome");
});

Route::resource("employees", EmployeeController::class);
STEP 8: Update Employee model for fillable property
Now go to your models folder and open Employee model “Employee.php” and add the fillable property.
protected $fillable = [
    'name', 'email', 'details', 'address', 'phone_no', 'joining_date'
];
Step 9: After that we will update our EmployeeController for all the CRUD methods
For this remove everything from the EmployeeController and add the following code.
namespace App\Http\Controllers;

use App\Models\Employee;
use Illuminate\Http\Request;

class EmployeeController extends Controller
{
    public function index()
    {
        $employees = Employee::all();
        return view('employees.index', compact('employees'));
    }

    public function create()
    {
        return view('employees.create');
    }

    public function store(Request $request)
    {
        Employee::create($request->all());
        return redirect()->route('employees.index');
    }

    public function show(Employee $employee)
    {
        return view('employees.show', compact('employee'));
    }

    public function edit(Employee $employee)
    {
        return view('employees.edit', compact('employee'));
    }

    public function update(Request $request, Employee $employee)
    {
        $employee->update($request->all());
        return redirect()->route('employees.index');
    }

    public function destroy(Employee $employee)
    {
        $employee->delete();
        return redirect()->route('employees.index');
    }
}
That’s it! we are done.
Note: This article is outdated, updated one will come very soon.


